Usage Guide
Basic Usage
Adding Style Metadata to Cells
In Jupyter notebooks, you can add style metadata to cells in several ways:
Via Notebook Interface
Select a cell
Open the cell metadata editor (View → Cell Toolbar → Edit Metadata)
Add the style metadata:
{
  "style": {
    "background-color": "#f0f0f0",
    "border": "2px solid #333",
    "padding": "10px"
  }
}
Programmatically
from IPython.display import Javascript, display

# Set style for current cell
display(Javascript('''
    var cell = Jupyter.notebook.get_selected_cell();
    cell.metadata.style = {
        "background-color": "#e8f4f8",
        "border-left": "5px solid #2196F3"
    };
'''))
Exporting with Custom Styles
HTML Export
Command Line
Use the styled_html exporter with nbconvert:
jupyter nbconvert --to styled_html notebook.ipynb
With custom configuration:
jupyter nbconvert --to styled_html \
    --StylePreprocessor.style_metadata_key="custom_style" \
    notebook.ipynb
Python API
from jupyter_export_html_style import StyledHTMLExporter
from nbconvert.preprocessors import Preprocessor

# Create exporter
exporter = StyledHTMLExporter()

# Export notebook
with open('notebook.ipynb', 'r') as f:
    notebook_content = f.read()

(body, resources) = exporter.from_filename('notebook.ipynb')

# Save output
with open('output.html', 'w') as f:
    f.write(body)
PDF Export (with Styles)
The styled_webpdf exporter allows you to export notebooks to PDF via HTML while preserving all custom cell styles, embedded images, and styling information.
Prerequisites
PDF export requires Playwright and Chromium:
# Install nbconvert with webpdf support
pip install nbconvert[webpdf]

# Install Chromium browser
playwright install chromium
Command Line
Use the styled_webpdf exporter with nbconvert:
jupyter nbconvert --to styled_webpdf notebook.ipynb
With custom configuration:
jupyter nbconvert --to styled_webpdf \
    --StyledWebPDFExporter.paginate=False \
    --StyledWebPDFExporter.allow_chromium_download=True \
    notebook.ipynb
Python API
from jupyter_export_html_style import StyledWebPDFExporter

# Create exporter
exporter = StyledWebPDFExporter()

# Export notebook to PDF
(pdf_data, resources) = exporter.from_filename('notebook.ipynb')

# Save output
with open('output.pdf', 'wb') as f:
    f.write(pdf_data)
PDF Export Options
The StyledWebPDFExporter supports several configuration options:
paginate(default:True): Split the notebook into multiple pages. Set toFalsefor a single long page.allow_chromium_download(default:False): Allow automatic download of Chromium if not found.disable_sandbox(default:False): Disable Chromium sandbox (required in some container environments).
Example with options:
exporter = StyledWebPDFExporter(
    paginate=False,  # Single long page
    allow_chromium_download=True,  # Auto-download Chromium
    disable_sandbox=False  # Keep sandbox enabled
)
Container Environments
When running in containers (Docker, Kubernetes, etc.), you may need to disable the Chromium sandbox:
jupyter nbconvert --to styled_webpdf \
    --StyledWebPDFExporter.disable_sandbox=True \
    notebook.ipynb
Warning: Disabling the sandbox reduces security and should only be done in trusted environments.
Configuration
nbconvert Configuration
Create a nbconvert_config.py file:
# Configure the StylePreprocessor
c.StylePreprocessor.style_metadata_key = "style"
c.StylePreprocessor.enabled = True

# Configure the StyledHTMLExporter
c.StyledHTMLExporter.template_name = "classic"
Advanced Styling
CSS String Format
You can also use CSS strings directly:
{
  "style": "background-color: #fff3cd; border: 1px solid #ffc107; padding: 15px;"
}
Conditional Styles
Apply different styles based on cell type:
# In a code cell
def apply_style_if_error(cell):
    if cell.get('outputs') and any('error' in str(output) for output in cell['outputs']):
        cell['metadata']['style'] = {
            'background-color': '#ffebee',
            'border-left': '4px solid #f44336'
        }
Integration with JupyterLab
When the JupyterLab extension is installed, you can:
Use the Export menu with “Styled HTML” option
Configure default styles in JupyterLab settings
Preview styled exports before saving
Visual Examples Gallery
Below are rendered examples showing what different styling options look like when exported to HTML. These examples demonstrate the visual impact of various styling techniques.
Cell-Level Styling Examples
This example demonstrates various cell-level styling options including highlighted cells, error/warning styles, success messages, gradient backgrounds, and shadow effects.
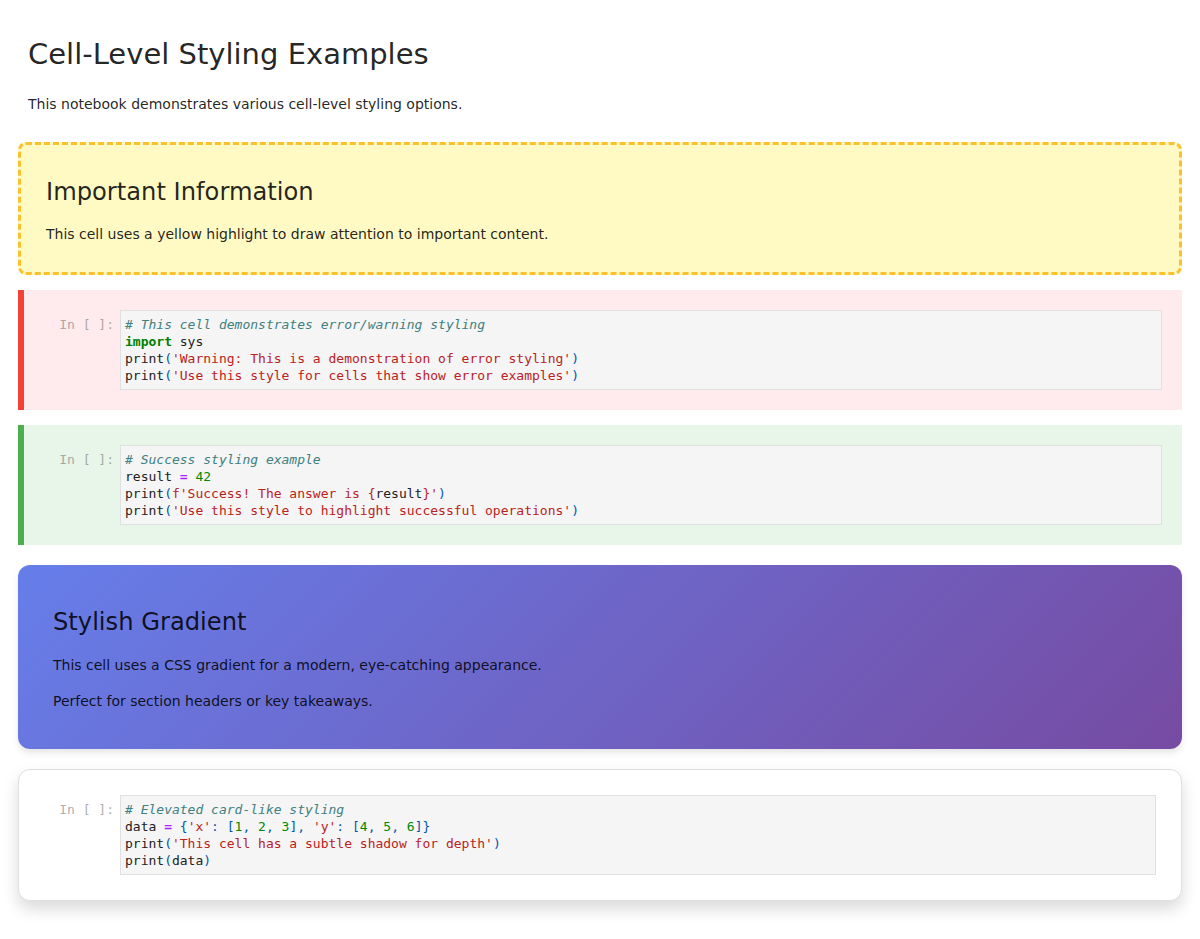
Features shown:
Yellow highlighted important cells with dashed borders
Error/warning cells with red left border
Success cells with green accents
Gradient backgrounds for section headers
Box shadows for elevated card-like appearance
Input and Output Styling
This example shows how to apply different styles to the input (code) and output (results) areas of code cells independently.
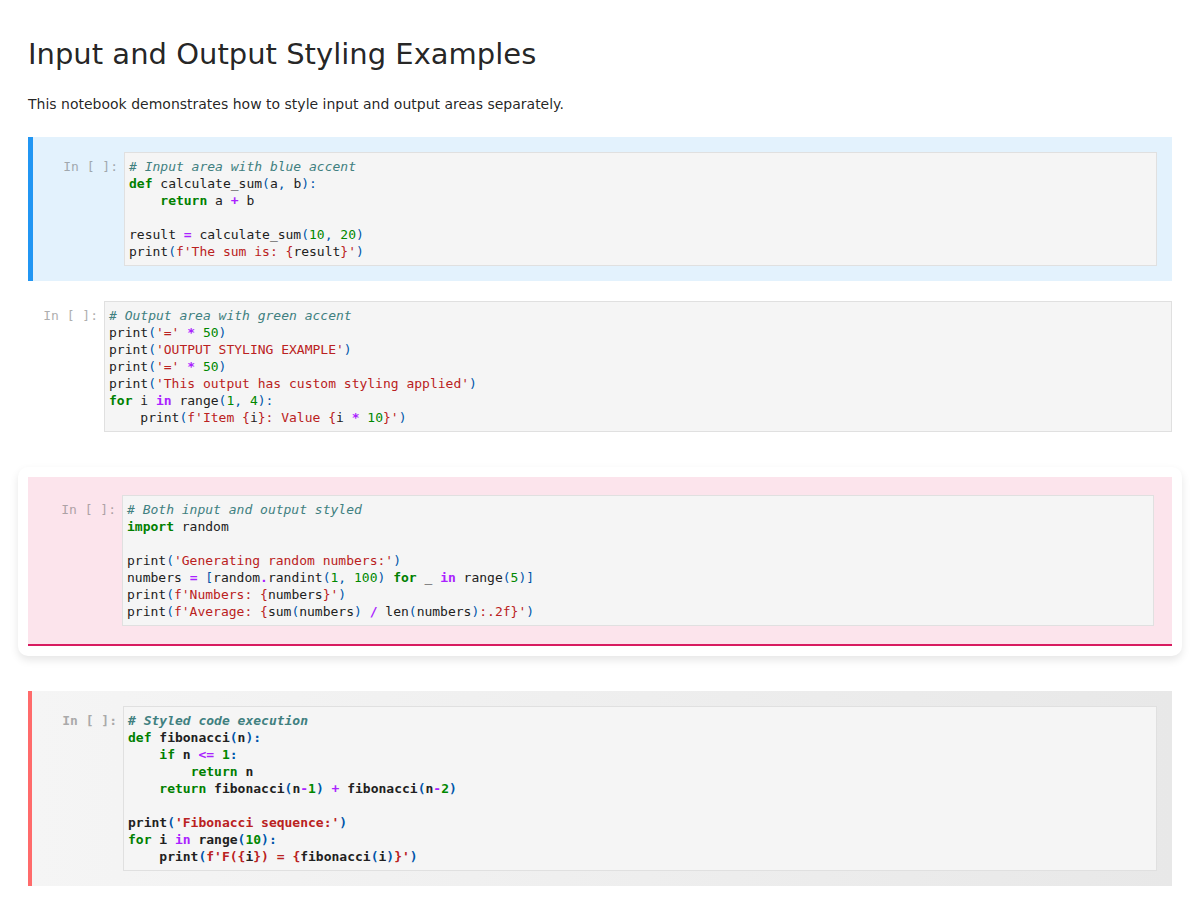
Features shown:
Blue-accented input areas with custom fonts
Green-themed output areas with borders
Combined styling with contrasting input/output colors
Gradient backgrounds for code sections
Custom padding and borders
Custom CSS Classes
This example demonstrates using custom CSS classes with an external stylesheet for reusable, maintainable styling.
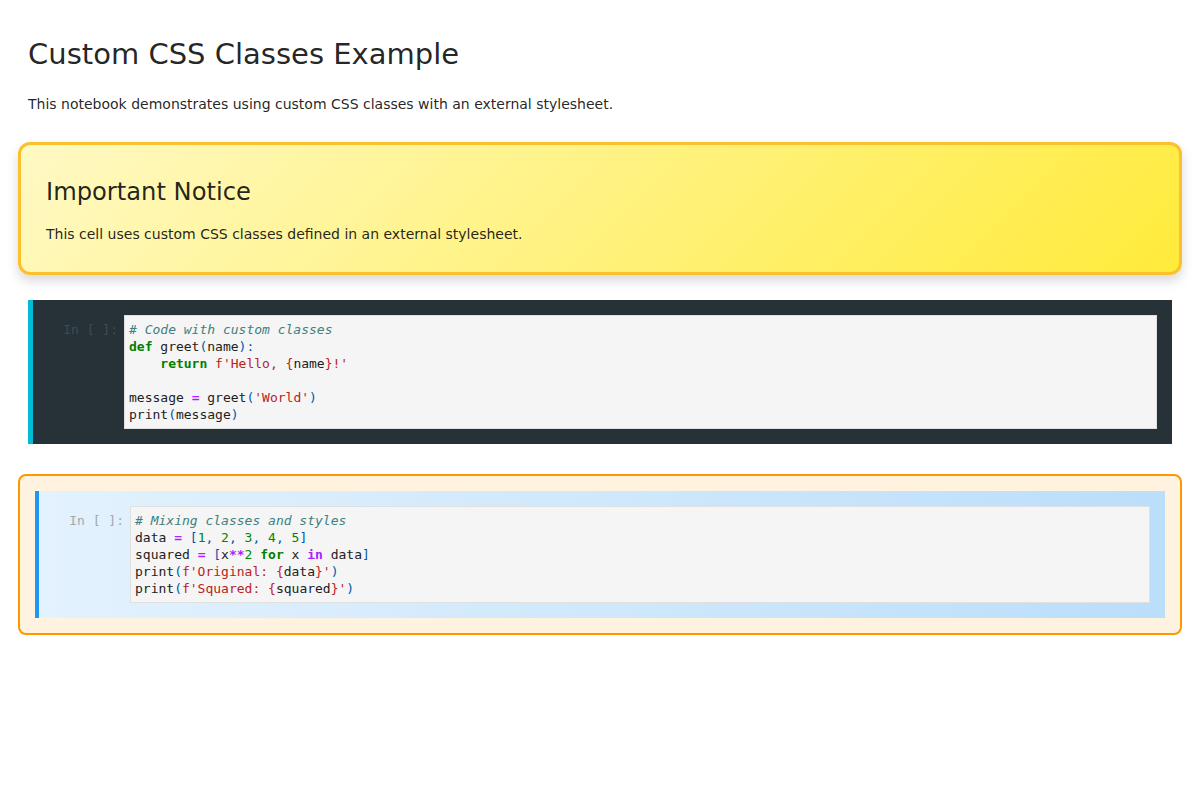
Features shown:
Custom CSS classes from external stylesheet
Reusable style definitions
Dark-themed code highlighting
Class-based styling combined with inline styles
Notebook-Level Styling
This example shows how to apply global styles that affect the entire notebook, creating a cohesive, professional appearance.
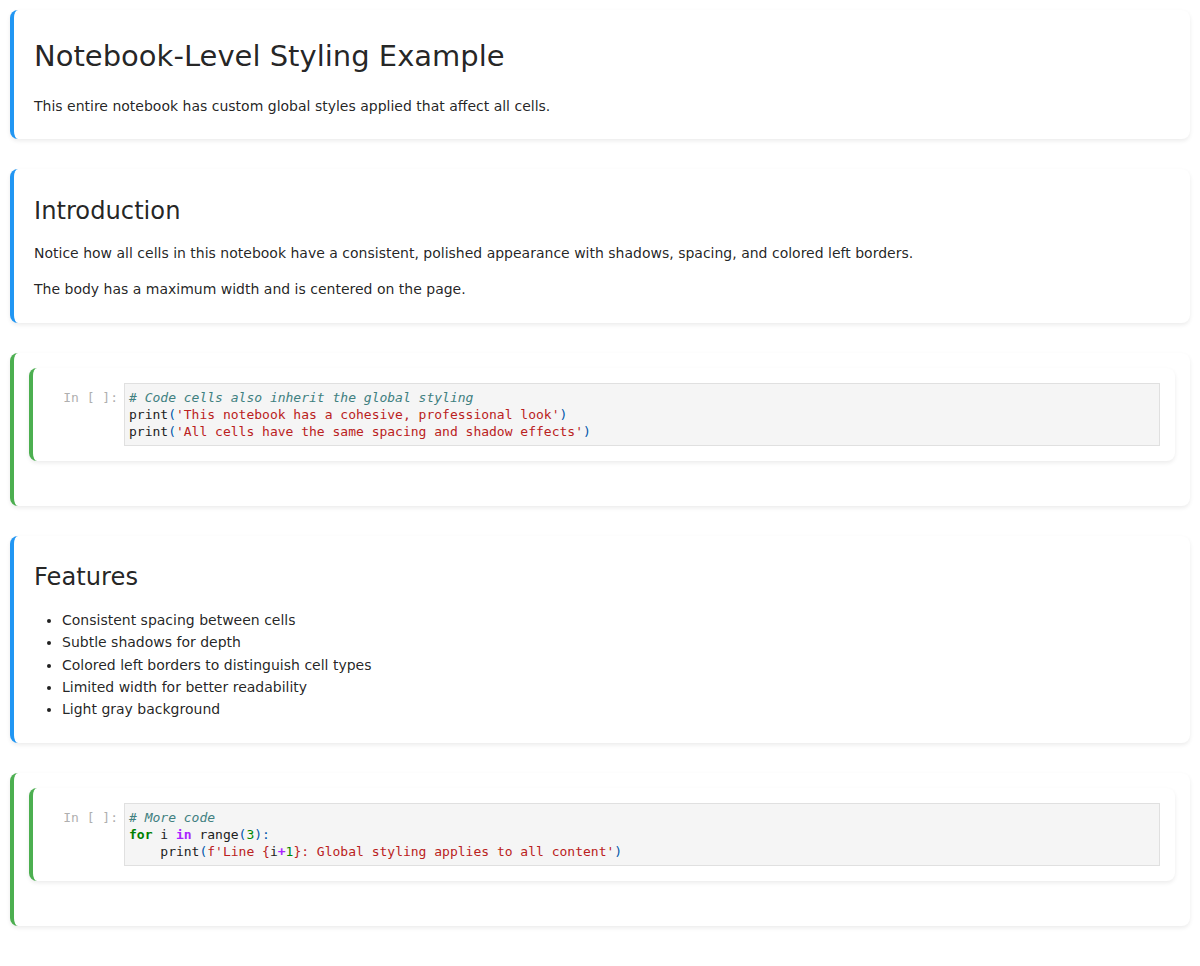
Features shown:
Global font and layout settings
Consistent spacing and shadows on all cells
Colored left borders to distinguish cell types
Maximum width for better readability
Light gray page background
Comprehensive Demo
This comprehensive example combines multiple styling techniques in a single notebook to create a polished, professional document.
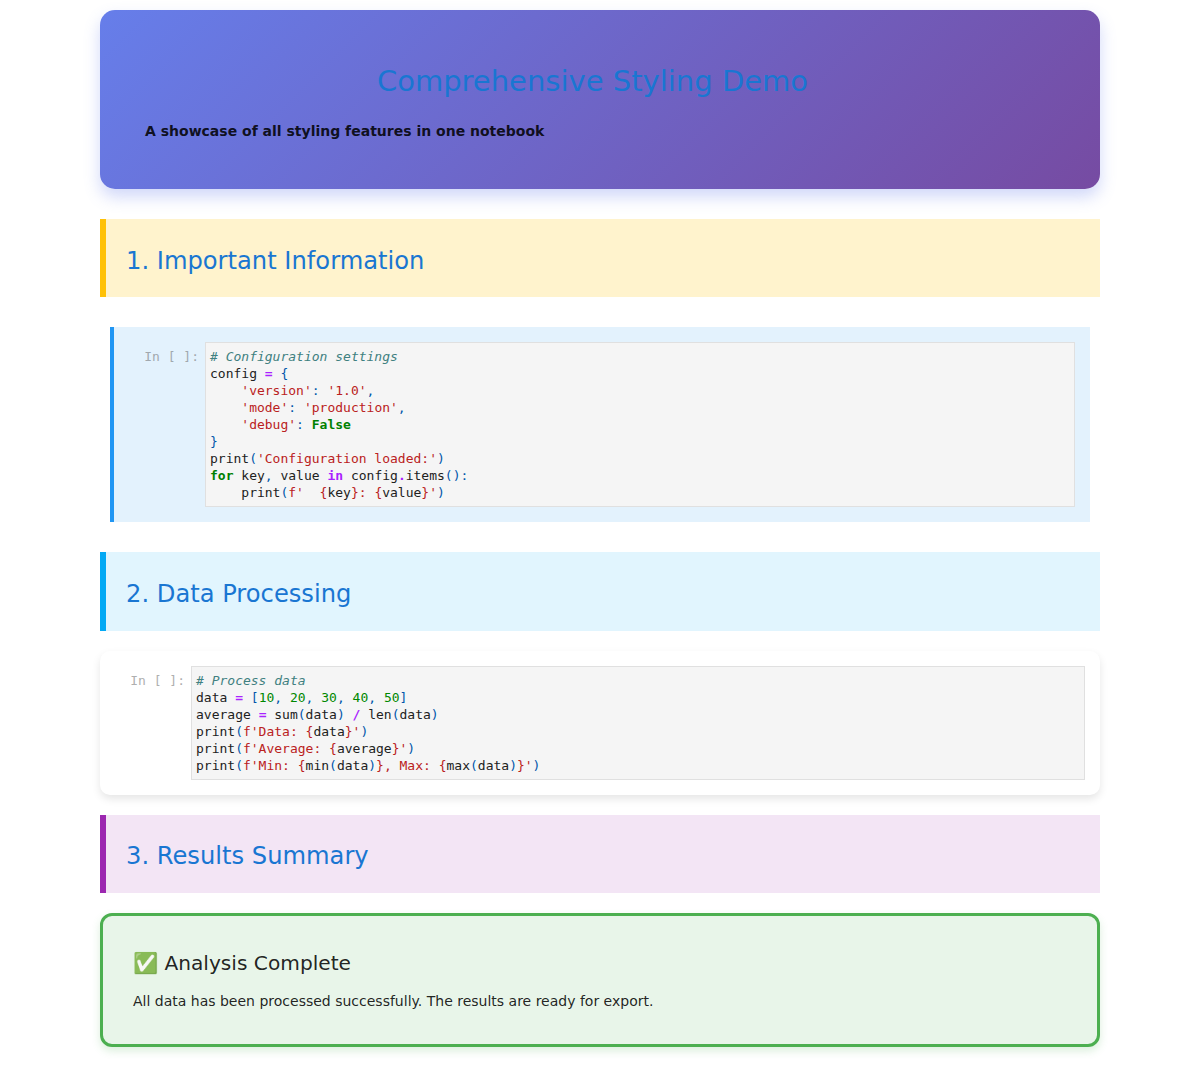
Features shown:
Gradient header with centered text
Color-coded sections (warnings, info, results)
Combined cell, input, and output styling
Box shadows and rounded corners
Professional color scheme throughout
Examples
Example 1: Cell-Level Styling
Highlight important cells:
{
  "style": {
    "background-color": "#fff9c4",
    "border": "2px dashed #fbc02d",
    "padding": "12px",
    "margin": "8px 0"
  }
}
Example 2: Input and Output Styling
Style the input and output areas of a cell separately:
Input-Only Styling
{
  "input-style": {
    "background-color": "#f5f5f5",
    "border-left": "4px solid #2196f3",
    "padding": "10px",
    "font-family": "monospace"
  }
}
Output-Only Styling
{
  "output-style": {
    "background-color": "#e8f5e9",
    "border": "1px solid #4caf50",
    "padding": "8px",
    "font-family": "monospace",
    "font-size": "14px"
  }
}
Combined Cell, Input, and Output Styles
{
  "style": {
    "margin": "20px 0",
    "border-radius": "8px",
    "box-shadow": "0 2px 4px rgba(0,0,0,0.1)"
  },
  "input-style": {
    "background-color": "#fce4ec",
    "color": "#880e4f",
    "padding": "12px"
  },
  "output-style": {
    "background-color": "#e8f5e9",
    "font-family": "monospace",
    "padding": "12px"
  }
}
Example 2b: Custom CSS Classes
Instead of (or in addition to) inline styles, you can apply custom CSS classes to cells and their components. This is useful when working with external stylesheets.
Cell-Level Classes
Add custom CSS classes to the cell container:
{
  "class": "highlight-important"
}
You can also add multiple classes:
{
  "class": "highlight-important warning-cell bordered"
}
Input and Output Classes
Apply custom classes to input and output areas separately:
{
  "input-class": "code-highlight",
  "output-class": "result-highlight"
}
Combining Classes and Styles
Use both custom classes and inline styles together:
{
  "class": "important-cell",
  "style": {
    "margin": "20px 0"
  },
  "input-class": "code-section",
  "input-style": {
    "border-left": "4px solid #2196f3"
  },
  "output-class": "result-section",
  "output-style": {
    "background-color": "#f0f0f0"
  }
}
Using with External Stylesheets
Define your CSS classes in a separate stylesheet and reference it in the notebook metadata:
custom-styles.css:
.highlight-important {
  background-color: #fff9c4;
  border: 2px solid #fbc02d;
  padding: 12px;
  margin: 8px 0;
}

.code-highlight {
  background-color: #f5f5f5;
  border-left: 4px solid #2196f3;
  padding: 10px;
  font-family: 'Courier New', monospace;
}

.result-highlight {
  background-color: #e8f5e9;
  border-left: 4px solid #4caf50;
  padding: 10px;
}

.warning-cell {
  border: 2px dashed #ff9800;
}

.bordered {
  border-radius: 8px;
  box-shadow: 0 2px 4px rgba(0,0,0,0.1);
}
Notebook metadata:
{
  "metadata": {
    "stylesheet": "custom-styles.css"
  }
}
Cell metadata:
{
  "class": "highlight-important bordered",
  "input-class": "code-highlight",
  "output-class": "result-highlight"
}
When exported, the local stylesheet will be embedded inline, and your custom classes will be applied to the appropriate HTML elements.
Example 3: Error/Warning Styling
{
  "style": {
    "background-color": "#ffebee",
    "border-left": "5px solid #f44336",
    "padding": "10px"
  }
}
Example 4: Success/Info Styling
{
  "style": {
    "background-color": "#e8f5e9",
    "border-left": "5px solid #4caf50",
    "padding": "10px"
  }
}
Example 5: Notebook-Level Styling
Add custom styles and stylesheets to the entire notebook by adding metadata to the notebook (not individual cells):
Note: As of the latest version, local or relative CSS file paths will be automatically embedded as inline styles in the exported HTML, making the file self-contained. Remote URLs (http:// or https://) will remain as external <link> tags.
Via Notebook Interface
Open the notebook metadata editor (Edit → Edit Notebook Metadata)
Add the style metadata:
{
  "style": ".jp-Cell { box-shadow: 0 2px 4px rgba(0,0,0,0.1); }",
  "stylesheet": "custom-theme.css"
}
Or with both local and remote stylesheets:
{
  "stylesheet": [
    "custom-theme.css",
    "https://example.com/remote-theme.css"
  ]
}
Programmatically
import nbformat

# Load notebook
with open('notebook.ipynb', 'r') as f:
    nb = nbformat.read(f, as_version=4)

# Add notebook-level styles
nb.metadata['style'] = """
.jp-Cell {
    box-shadow: 0 2px 4px rgba(0,0,0,0.1);
    margin-bottom: 20px;
}
body {
    font-family: 'Segoe UI', Tahoma, Geneva, Verdana, sans-serif;
    max-width: 1200px;
    margin: 0 auto;
}
"""

# Add stylesheets - local files will be embedded, remote URLs will be linked
nb.metadata['stylesheet'] = [
    'local-styles.css',  # Will be embedded as inline styles
    'https://fonts.googleapis.com/css2?family=Roboto:wght@300;400;500&display=swap',  # Will remain as <link> tag
]

# Save notebook
with open('notebook.ipynb', 'w') as f:
    nbformat.write(nb, f)
Security Note: Path traversal attempts (e.g., ../../../etc/passwd) are automatically blocked and will fallback to <link> tags.
Example 6: Complete Styled Notebook
A comprehensive example combining all style types:
import nbformat
from nbformat.v4 import new_code_cell, new_markdown_cell, new_notebook

# Create cells with various styles
cells = []

# Title cell with styling
title_cell = new_markdown_cell("# Styled Report")
title_cell.metadata['style'] = {
    'background-color': '#e3f2fd',
    'padding': '20px',
    'border-radius': '8px'
}
cells.append(title_cell)

# Code cell with input styling
code_cell = new_code_cell("import pandas as pd\ndata = pd.read_csv('data.csv')")
code_cell.metadata['input-style'] = {
    'background-color': '#f5f5f5',
    'border-left': '4px solid #2196f3'
}
cells.append(code_cell)

# Code cell with output styling
result_cell = new_code_cell("print(data.describe())")
result_cell.metadata['output-style'] = {
    'background-color': '#e8f5e9',
    'border': '1px solid #4caf50',
    'font-family': 'monospace'
}
cells.append(result_cell)

# Create notebook
nb = new_notebook(cells=cells)

# Add notebook-level styling
nb.metadata['style'] = """
body {
    font-family: 'Segoe UI', sans-serif;
    max-width: 1200px;
    margin: 0 auto;
    padding: 20px;
}
.jp-Cell {
    margin-bottom: 20px;
}
"""
nb.metadata['stylesheet'] = 'https://fonts.googleapis.com/css2?family=Segoe+UI&display=swap'

# Save and export
with open('styled_notebook.ipynb', 'w') as f:
    nbformat.write(nb, f)
Then export:
jupyter nbconvert --to styled_html styled_notebook.ipynb
Troubleshooting
Styles Not Applied
Verify metadata is correctly formatted JSON
Check that the exporter is using
styled_htmlEnsure the preprocessor is enabled
CSS Conflicts
If styles don’t appear as expected:
Use more specific CSS selectors
Add
!importantto style valuesCheck browser developer tools for conflicts
Next Steps
See the API Reference for detailed class documentation
Check out examples on GitHub